Introduction to Git
What is Git?
Git is the most popular distributed version control system that is used to track changes in source code during software development.
You might be wondering, what does that mean? Well, it means that Git helps you keep track of changes in your codebase. It allows you to save different versions of your code, and you can go back to any version at any time. This is especially useful when you're working on a project with multiple people, as it helps you keep track of who made what changes and when.
Here's a two-minute video that explains what this means:
Why use Git?
If you are working on a project that involves:
- collaborating with other people,
- keeping track of changes in your codebase,
- working on multiple features at the same time,
- trying out different things without breaking your code,
- being able to go back to a previous version of your code,
- being able to work on your code from different devices,
- working offline and syncing your changes later,
- or just being able to sleep at night knowing that your code is safe and sound,
then you should definitely use Git.
Getting started
Installing Git
Frist, you ned to have Git installed on your computer.
If you already have Chocolately package manager (opens in a new tab) installed, you can install Git by running the following command in your terminal:
choco install gitIf you do not have Chocolately, you can install Git by downloading the installer from the official Git website (opens in a new tab). Run the installer and follow the instructions in the installer.
To verify that git is installed, you can run
git --version
in your terminal and you should see the version of Git that is installed on your system.
Your first repository
Git works by creating a repository (aka repo) that contains all the files and folders in your project. You can think of a repository as a folder that contains all the versions of your code. When you make changes to your code, Git keeps track of those changes and saves them in the repository. You can then go back to any version of your code at any time.
You can either create a new repository or clone an existing repository.
git clone <repository-url>You can get the repository-url from the repository you want to clone. This is often shown on the repository's page on the platform where the repository is hosted (e.g. GitHub, GitLab, Bitbucket).
Here's an example of where you can find the repository URL on GitHub:
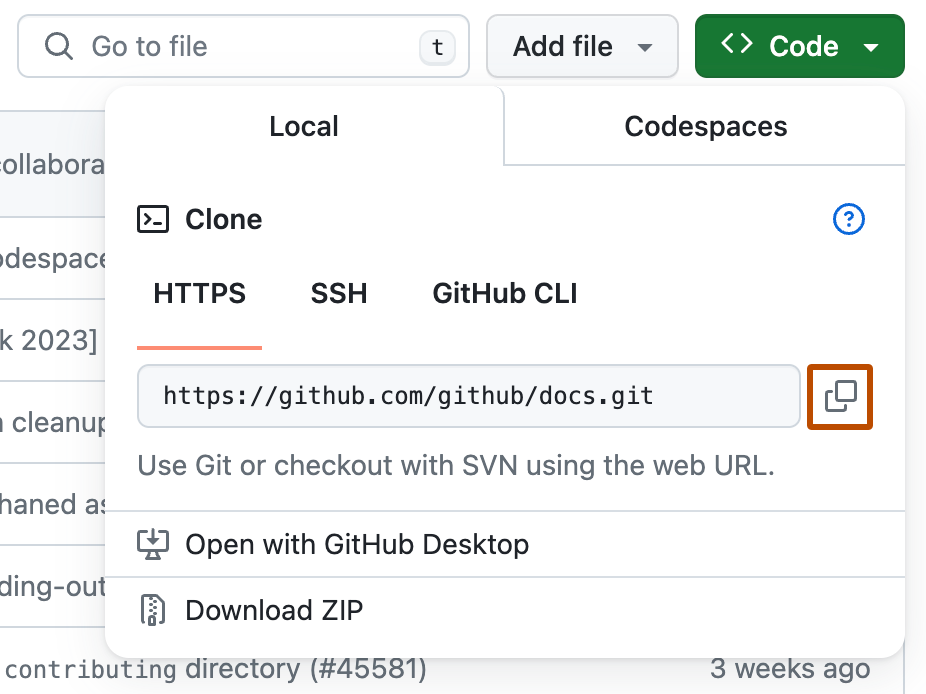
You'll notice that there is more than one way to clone a repository. You can use the https URL or the ssh URL. The https URL is easier to use, but the ssh URL is more secure and doesn't require you to enter your username and password every time you push changes to the repository. If you're not sure which one to use, you can use the https URL.
Intrested in learning more about the difference between https and ssh URLs?
Check out this GitHub article (opens in a new tab).
Did you notice that there is a third option called "GitHub CLI"?
This is a command-line tool that allows you to interact with GitHub from the command line. You can learn more about it here (opens in a new tab).
Staging changes
Now that you have a repository set up, you can start making changes like adding/deleting files or modifying existing files. Once you've made some changes, you can use the git add command to add those changes to the staging area. The staging area is where you prepare your changes before you commit them to the repository.
git add <file1> <file2> <...>If you want to add all the changes in your working directory to the staging area, you can use the . (dot) symbol.
git add .you can also use regular expressions to add files to the staging area. For example, if you want to add all the .md files in your working directory to the staging area, you can use the following command:
git add *.mdWhat is the difference between the working directory, the staging area, and the repository?
- The working directory is where you make changes to your code. This is just a regular folder on your computer.
- The staging area is where you prepare your changes before you 'commit' them to the repository. When you add changes to the staging area, you are telling Git that you want to save these changes in the next commit. Maybe you want to commit some changes but not others, or maybe you want to commit all the changes at once. The staging area allows you to do this.
- The repository is where all the versions of your code are stored. When you commit your changes, Git takes the changes from the staging area and saves them in the repository.
Committing changes
Once you've added your changes to the staging area, you can use the git commit command to commit those changes to the repository.
git commit -m "Your commit message here"The -m flag is used to add a message to your commit. This message should be a short description of the changes you made in this commit. It's a good idea to write meaningful commit messages so that future you and your team members can understand what changes were made in each commit.
Here are some exmaples of good and bad commit messages:
👍added introduction chapter to the book,fixed dimensions of video iframe on small screens👍
👎fixed stuff,updated code,changes,I'm tired and just want to go home👎
Now I know how to stage and commit changes. But what is a commit?
A commit is a snapshot of your code at a specific point in time. When you commit your changes, Git takes a snapshot of your code and saves it in the repository. This allows you to go back to this snapshot at any time in the future. You can think of a commit as a save point in a video game. You can save your progress at any time and then go back to that save point if you need to.
Git only saves the changes you've made in a commit, not the entire codebase. This makes commits very efficient and allows you to save many different versions of your code without taking up a lot of space. It also allows you to see who made what changes and when, which is very useful when working on a project with multiple people.
In case something goes wrong, you can always revert the changes made in a commit or reset to a previous commit where things were working fine (see git revert (opens in a new tab) & git reset (opens in a new tab)).
To view the commit history of your repository, you can use the git log command.
git logBranches
Branches are a powerful feature of Git that allow you to work on different features of your project at the same time without affecting the main codebase. When you create a new branch, you create a copy of the main codebase that you can work on independently. This allows you to experiment with new features, fix bugs, or make changes without affecting the main codebase.

For example, let's say you're working on a project and you want to add a new feature. You can create a new branch and work on this feature in this branch. Once you're done with the feature, you can merge the changes back into the main codebase. Other team members can also create branches and work on different features at the same time. This allows you to work on multiple features in parallel and only merge the changes back into the main codebase when they are ready and tested.
There are many ways to create and manage branches in Git. Here are some common commands that you can use to work with branches:
-
git branch: This command lists all the branches in your repository. The branch with the*symbol next to it is the branch you are currently on. -
git branch <branch-name>: This command creates a new branch with the name<branch-name>. -
git checkout <branch-name>: This command switches to the branch with the name<branch-name>. You can also create a new branch and switch to it in one command by using the-bflag. -
git switch <branch-name>: This command switches to the branch with the name<branch-name>. You can also create a new branch and switch to it in one command by using the-cflag.
simply use any of them to create a new branch or switch to an existing branch.
Syncing local and remote repositories
Your local repo is not automatically synced with the remote repository. which means that the changes you make in your local repository are not automatically reflected in the remote repository. Same goes for the changes made in the remote repository, they are not automatically reflected in your local repository.
There are two main commands that you can use to sync your local and remote branches: git push and git pull.
git push: local → remote
git pull: remote → local
When you push changes to the remote repository, you are sending the changes you made in your local repository to the remote repository. This allows other team members to see the changes you made and work on them. When you pull changes from the remote repository, you are getting the changes made by other team members and syncing them with your local repository. This allows you to see the changes made by other team members and work on them.
Got an error when pushing to an untracked branch?
Depending on which path you took to create a new branch, you might get an error when you try to push changes to the remote repository. This is because the remote repository does not know about the new branch you created. It is important to understand that the remote repository does not automatically create a new branch when you create a new branch in your local repository. You have to tell the remote repository about the new branch by using the --set-upstream flag when you push changes to the remote repository for the first time. This is not just to annoy you with extra commands, it is a security feature that prevents you from accidentally pushing changes to the wrong branch.
To fix this error, you can use the following command the first time you push changes to a new branch:
git push --set-upstream origin <branch-name>Merging branches
Perhaps the main reason why branches are so powerful is that they allow you to work on different features of your project at the same time without affecting the main codebase. But what's the point of working on different features if you can't bring them together in the end?
This is where merging comes in. Merging is the process of combining the changes from one branch into another branch. When you merge a branch into another branch, you are taking the changes made in the first branch and applying them to the second branch. This allows you to bring together the changes made in different branches and create a new version of your code that includes all the changes.
You can either merge branches locally or remotely. Merging branches locally means that you merge the changes in your local repository, while merging branches remotely means that you merge the changes in the remote repository. In both cases, it is advisable to sync your local and remote repositories after the merge.
There are two main ways to merge branches in Git: git merge and git rebase. For now, we'll focus on git mergesince it is the simpler of the two. If you are intrested in learning more about git rebase, here's a great article (opens in a new tab).
Even though using both
git mergeandgit rebasecan be configured for the remote repository as well, is is mostly simplified with a graphical interface like GitHub or GitLab. That's why it is more important to talk about them in the context of local repositories. Because that is where you will be using them the most.
To merge a branch into another branch, you can use the git merge command. For example, if you want to merge the changes from the feature-branch into the main branch, you can use the following command:
git checkout main         # switch to the branch you want to merge into
git merge feature-branch  # merge the changes from feature-branch into main
In a prefect world, that would be all you need to do to merge two branches. But in the real world, you might run into conflicts when you try to merge two branches. A conflict occurs when Git is unable to automatically merge the changes from two branches. This can happen when two branches have made changes to the same part of a file, or when the changes made in one branch conflict with the changes made in another branch.
When you run into a conflict, Git will tell you which files have conflicts and ask you to resolve them manually 😪. You can do this by opening the conflicted files in your code editor, resolving the conflicts, and then committing the changes. Once you've resolved all the conflicts, you can continue the merge by running git merge --continue.
If you prefer to use a specific code editor for resolving conflicts
you can configure Git to use that editor. You can do this by setting the merge.tool configuration option in Git. For example, if you want to use Visual Studio Code as your merge tool, you can run the following command:
# the global flag is used to set the configuration globally.
# You can also set it locally for a specific repository by omitting the global flag.
git config --global merge.tool vscode
Summary
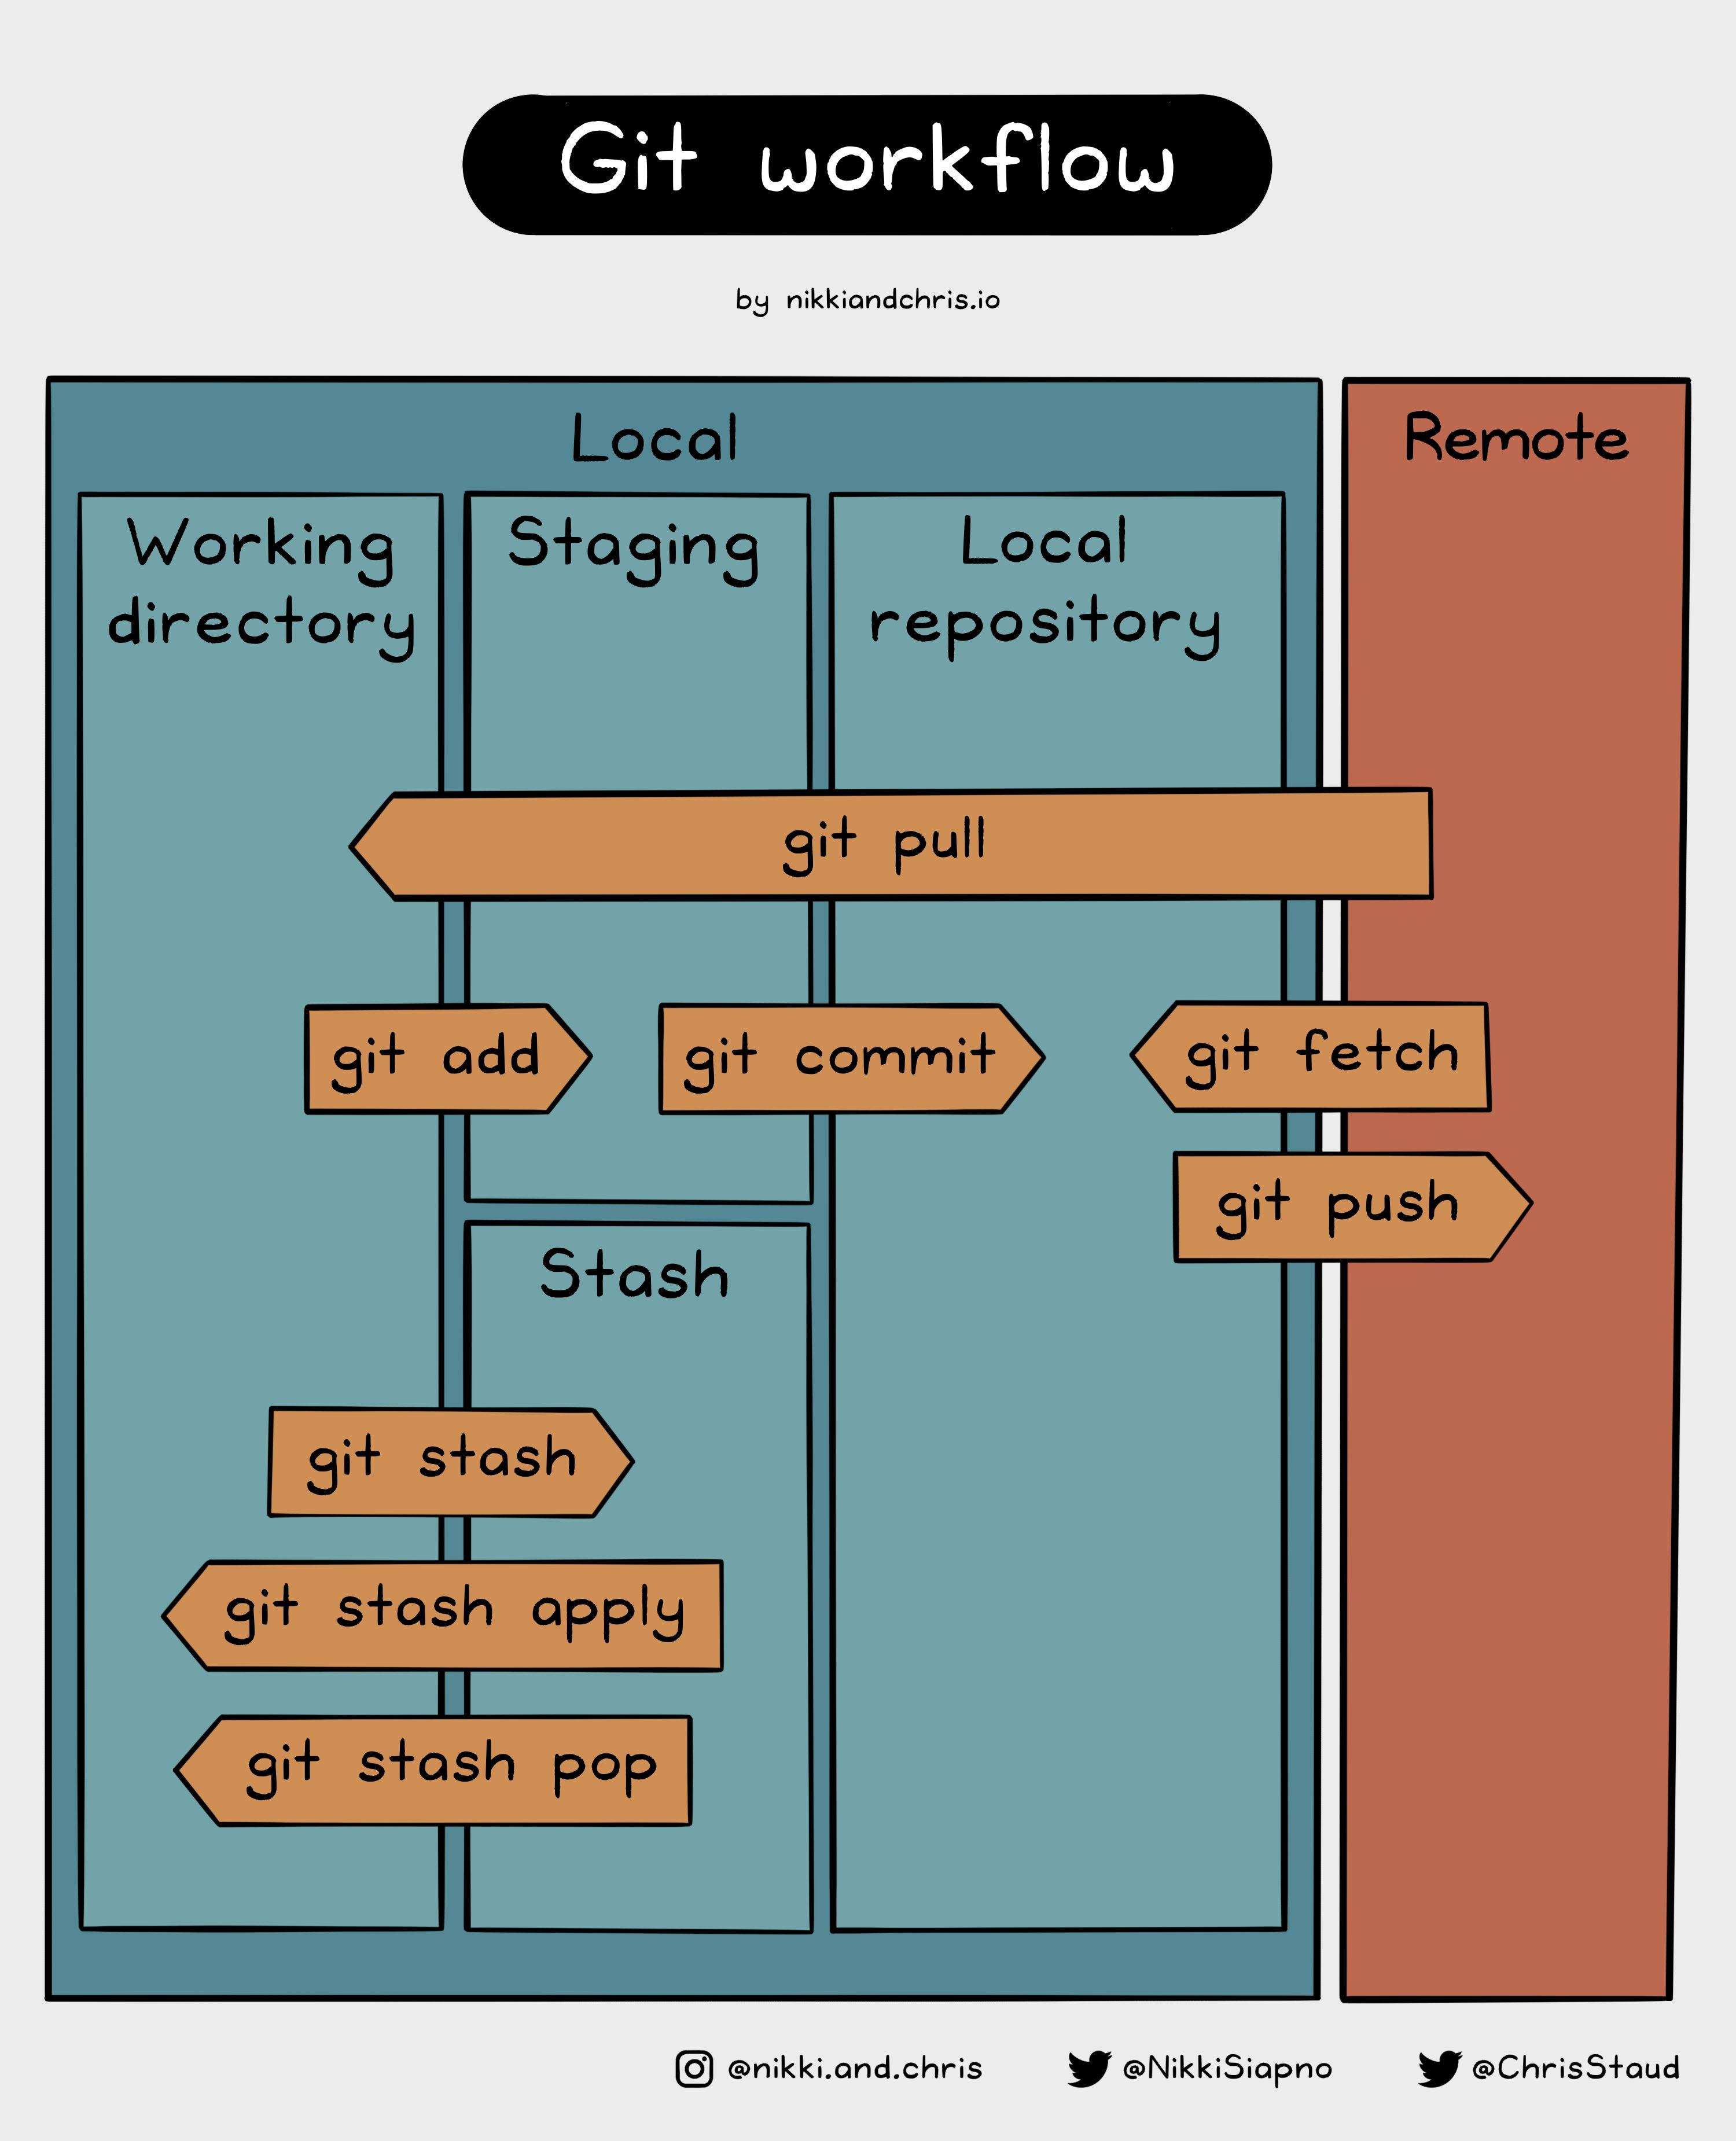
In this guide, we've covered the basics of Git and how you can use it to track changes in your codebase. We've learned how to create a new repository, add and commit changes, create and merge branches, and sync local and remote repositories. We found a nice image that shows the different areas of git and how they interact with each other by nikkiandchris (opens in a new tab) that could help you remember most of the basic commands.
You can also watch this 2-minute video that summarizes what we've covered in this guide:
Further reading
What we've covered in this guide is just the tip of the iceberg when it comes to Git. There are many more advanced features and commands that you can use to work with Git. But don't worry, you don't have to learn everything at once. What you learned in this guide is enough to get you started with Git and start using it in your projects. As you become more comfortable with Git, you can explore more advanced features and commands. Here are some resources that you can use to learn more about Git:
- Learn Git in 20 Minutes (opens in a new tab) Goes over the same basic conepts but in a more visual way and in a bit more depth to explin the cencepts behind them.
- Git Documentation (opens in a new tab) The official Git documentation is a great resource for learning more about Git. It covers everything from the basics to advanced features and commands.
- Pro Git Book (opens in a new tab) This is a free book that covers everything you need to know about Git. It's a great resource for learning Git in depth.
- Getting Git right (opens in a new tab) Atlassian has a great collection of resources for learning Git. They cover everything from the basics to advanced topics with easy to understand guides and tutorials.